Learn something new everyday! I was just scrolling on Twitter when I saw my astronomy crush Will Gater tweet about using the raw black and white images from the Perseverance Rover on Mars to create colored images. Here's how to do it yourself, and a little about how it works.
 |
| My color processed image from Mars! |
Any 24-bit color image is really made up of 3 individual 8-bit images - one for red, one for green, and one for blue (Wikipedia). These are referred to as RGB channel data. But how can a black and white image represent a color? The black and white images show how prominent the color is - the white represents the color and the black represents the absence of the color. So the brighter the image, the more of that color is present.
All you have to do to get a color photo out of the individual 8-bit images is the combine them. All the information is already right there, you just have to tell the computer which black and white image represents which color channel.
Alright so the first thing you need is raw RGB channel images from Mars. Luckily NASA has tons of free images that you can use. After all, your taxes paid to get this rover to Mars in the first place. Here's a link to the page where you can download raw images: https://mars.nasa.gov/mars2020/multimedia/raw-images/
I just looked for 3 of the same image in the gallery assuming the 3 nearly identical images go together to create one color photo. The next bit took me a second, which one is which color? It's a safe bet that if you have a photo of the red soil that red should be the brightest image. I played around with it for a bit and then realized the photos are actually labeled in the file name. Here are the 3 raw images I used to make my photo: Red, Green, Blue
Next, assign the images to the RGB channel layers in Photoshop. This is actually really easy. I watched this helpful video, but I think I can just show you in screen shots.
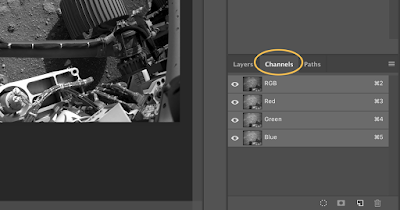
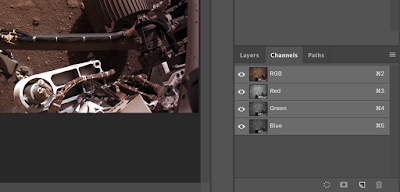
First open all 3 images. Start with the red image (says NLR in file name) and then go to the Channel tab in the bottom right. All 3 channels are the same because this is a black and white image. All you have to do is copy the green image and paste it into the green tab, copy the blue image and paste it into the blue tab, and that's it!
 |
| Click the Channel tab then click on a layer to paste the image for that color. If you started with the red image, you only have to paste blue and green to complete it |
 |
| You will see the color change after each layer you add, and the final image is all 3 channels combined |
I didn't do much post processing at all, just adjusted the white balance to the body of the rover ever so slightly. How cool is this! This color photo hasn't even been released to the public yet but I created it myself from the raw images.

