 |
| Result of iPhone video taken through MH9mm eyepiece on Meade 285 stacked in Registax |
My learn-by-doing astronomy and astrophotography blog and observing journal
Sunday, September 29, 2013
5 Second iPhone Video of Saturn Stacked in Registax
My latest personal best photo of Saturn is the result of stacking a 5 second video clip taken with my iPhone through the eyepiece of my telescope. My previous best came from a single frame of the video, but after stacking, I cleaned it up quite a bit! I also stacked a 34 second version of the video, but it ended up creating more problems than it solved.
DIY Paper Bahtinov Focusing Mask
Since my camera doesn't have live view, I have to focus through the little viewfinder. I figured a focusing aid might help me out. I read that a Bahtinov mask could help take some of the guessing out of trying to focus. I found a helpful post about making one yourself, and even a Bahtinov Focusing Mask Generator. I didn't have any black plastic, but I tried my best making one out of paper and it actually wasn't too bad.
Even this paper one works in principle - it "produces three angled diffraction spikes at the focal plane of the instrument" (Wikipedia). The problem is that my focuser sticks and jumps, and I only have a course focus. Knowing where focus is doesn't help if you can't accurately make adjustments - I just shoot past it in both directions but can't fine tune it. Oh well, not a bad little project!
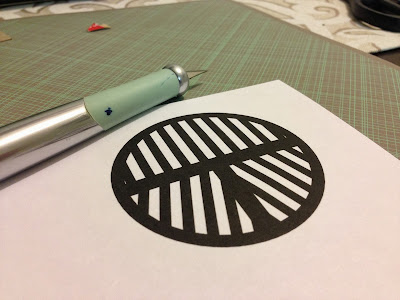 |
| I printed the image from the Bahtinov Focusing Mask Generator on cardstock |
 |
| ...and cut out the white spaces... |
 |
| ...which took me about 20 minutes. |
 |
| Then I cut out the disk itself. |
 |
| I wrapped paper around the end of my telescope and taped it for size, then attached the focusing mask with tape. |
 |
| I figured it doesn't really matter if the white or black side faces out. Looks kinda badass. |
Even this paper one works in principle - it "produces three angled diffraction spikes at the focal plane of the instrument" (Wikipedia). The problem is that my focuser sticks and jumps, and I only have a course focus. Knowing where focus is doesn't help if you can't accurately make adjustments - I just shoot past it in both directions but can't fine tune it. Oh well, not a bad little project!
Messier Marathon: M2, M10, M12, M14
Checking some more Messier objects off the list. M2 is one of the September observing list items, and the others (M10, M12, and M14) are all in the same area of the sky, the constellation Ophiuchus, so switching between them was quite easy.
I got M10, M12 and M 14 all in one session from my balcony. I got M2 on a separate night when I was also trying to get M39 but ended up being a little off, instead photographing the part of the sky that contains the North America Nebula (NGC 7000) which of course is too faint to even show up on my camera.
This brings my Messier total to 34 out of 110 objects!
 |
| 96 subs, 46 darks, 44 bias, ISO 1600, 300mm, f/5.6, 1.3 sec |
 |
| 75 subs, 46 darks, 44 bias, ISO 1600, 300mm, f/5.6, 1.3 sec |
 |
| 85 subs, 46 darks, 44 bias, ISO 1600, 300mm, f/5.6, 1.3 sec |
 |
| 102 subs, 46 darks, 44 bias, ISO 1600, 300mm, f/5.6, 1.3 sec |
Friday, September 27, 2013
Solar System Showcase: My Collection So Far
In the past year and a half, I've photographed every planet in the solar system and then some. I've always wanted to put them all together and see my collection all at once - so here it is! Hopefully as I learn to take photos with my scope, I will be able to improve upon this collection. But for now, this is what I've got.
 |
| Click to enlarge |
Labels:
Ceres,
Jupiter,
Mars,
Mercury,
Moon,
neptune,
saturn,
solar system,
Sun,
uranus,
Venus,
Vesta
Tuesday, September 24, 2013
Apparent Disk of Venus with Chromatic Aberration
Here is my photo next to a visualization of Venus at its current phase. Just like our moon, the inner planets* have phases based on their position relative to the Sun. As the light bends through the lens of my telescope, the different wavelengths of light are not converging at the same point, which causes the annoying smeared halo of colors on the edge of my image.
*From Earth, Venus can appear gibbous, quarter, or crescent (but never "full" because it would be on the other side of the Sun). Mars can be full or slightly gibbous, but doesn't display a wide range of phases. Planets further out don't change much at all.
 |
| My image (right) at prime focus through Meade 285 cropped and enlarged in Photoshop |
 |
| Canon at prime focus on 60mm refractor, grainy Instagram filter |
Monday, September 23, 2013
Baby Steps with Saturn
Incremental improvement is the name of the game. Here is a collage of two iPhone photos through my telescope eyepiece. This technique is called digiscoping (pointing a digital camera through the eyepiece of a telescope), which is a form of afocal photography (putting a camera where your eye would be behind a complete optical system), and it's pretty useful in limited situations.
The hardest part is holding the camera steady over the eyepiece. While there are some iPhone mounts available, for this latest attempt I used a tripod to hold my iPhone steady looking down through the eyepiece.
My previous attempt is on the left, and I actually took it during my "first light" night out with the scope, and I took it handheld without a tripod. On the right, my latest attempt with the camera on a tripod. I took a 30 second video and then took a screenshot of the best frame. (Yes, I do plan on stacking the video in Registax, but after a few frustrating attempts I called it a night. Not sure if the image is too small to find alignment points, or if the whole thing is in the wrong format).
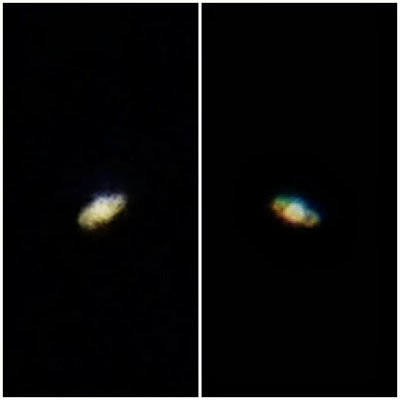 |
| Saturn with iPhone through eyepiece on Meade 285 refractor |
Backyard Astronomy with the Moon, M15, Mizar/Alcor and Some Plain Old Observing
This weekend I packed up all my gear and headed over to my friend John's house north of the city. It's not exactly dark skies, but there is a lot less light pollution from direct glare (but still can't escape the sky glow on the horizon). My goal was to photograph the moon, try to spot Andromeda through my scope, and then maybe check out some objects on the September list or just show John some double stars that I'm already familiar with.
I started by showing John how I set up my point and shoot to take star trail photos. We got this camera up and running first so that it could go the whole night while we were looking at other objects. Next, I went to the moon because it's such an easy target. We observed the moon, and then I tried to find the Andromeda Galaxy by star hopping. I still couldn't locate it with my scope! It must be too faint, and I must be too inexperienced.
After getting frustrated about Andromeda, I tried an easier target - I was able to find Albireo and showed John the color contrast between the two stars. Next, I tried to observe Beta Cephei, but I still couldn't resolve it into two different stars. I either had the wrong star, or my magnification (or resolution) just isn't high enough to split them.
I was, however, able to split Mizar and Alcor very easily. I put my camera back on the scope to take a few shots. I didn't notice it until I got the images onto my computer, but it looks like I actually got Mizar to split into its two subsequent stars (each of which are actually double stars themselves!). Tons of fun and quite the prolific night of observing!
 |
| 232 images stacked in StarStaX, taken with Canon Powershot at ISO 800, 15 sec each |
 |
| DSLR at prime focus on Meade 285, 1/50 sec, ISO 200, stack of 20 images |
 |
| DSLR on fixed tripod, 196 subs, 44 darks, 42 bias, ISO 1600, f/5.6, 1.3 sec, 300mm |
After getting frustrated about Andromeda, I tried an easier target - I was able to find Albireo and showed John the color contrast between the two stars. Next, I tried to observe Beta Cephei, but I still couldn't resolve it into two different stars. I either had the wrong star, or my magnification (or resolution) just isn't high enough to split them.
I was, however, able to split Mizar and Alcor very easily. I put my camera back on the scope to take a few shots. I didn't notice it until I got the images onto my computer, but it looks like I actually got Mizar to split into its two subsequent stars (each of which are actually double stars themselves!). Tons of fun and quite the prolific night of observing!
 |
| ISO 1600, 1/3 sec, Canon Rebel XT at prime focus on Meade 285 Mizar A/B have a separation of 14.4" (arcseconds) which I guess is about the limit of my setup |
Labels:
Alcor,
deep sky,
M15,
Mizar,
Moon,
prime focus,
star trails
Wednesday, September 18, 2013
Moon at Prime Focus with Canon Rebel XT on Meade Refractor
 |
| 16 frames stacked in Registax (not cropped, it's just that big at prime focus!) 1/250 sec, ISO 400 |
So I'm learning that the hardest part about prime focus is focusing! With my camera behind a 300mm autofocus lens, I've been cruising through moon photos like nobody's business. At prime focus, however, the telescope is my camera lens, and I have to crank the clunky focuser by hand.
I tried my best to find focus on the moon, and these photos are my result (after stacking to reduce noise). At this scale, I have to basically re-learn how to stack in Registax. I'm used to hand-selecting a few alignment points on a tiny moon, and now I have a whole field of craters and mountains to worry about. I feel like the increased magnification only magnifies the tiny errors in my focusing and processing. Sheesh! Be careful what you wish for.
The diameter of the moon on my photos is now around 1300 pixels compared to 430 pixels. This is good news for future prints! It also means (once I figure out a better way to focus) that I'll have to re-shoot my entire set of moon phase photos. The more you learn, the more steps you add, and the longer it takes to do anything just to squeeze out that extra bit of detail.
While processing this photo, I learned a couple tricks along the way. First is mirror lock-up on my Canon Rebel XT. While I was shooting, I noticed that my heavy camera on the end of a meter-long tube is very unstable. Even the mirror movement when I released the shutter seemed to shake the entire telescope. While I was outside sitting on the grass, I quickly looked up how to mirror lock my camera. I think I'll make that a separate post so hopefully it becomes a useful "how to" for anyone else looking.
Next, to make the moon mountains pop, I tried a new processing trick, Photoshop > Filter > Other > High Pass. I found this YouTube video pretty helpful. Here is the final result...
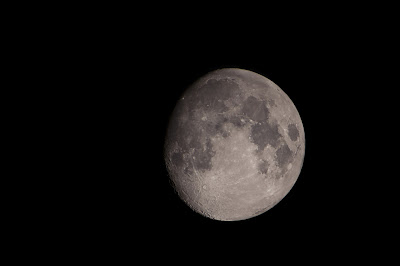 |
| 16 images stacked, color and High Pass layer in Photoshop |
Troubleshoot Prime Focus on 60mm Refractor (It Finally Works!!!)
In an earlier post I wrote about buying my first t-adapter to try to hook my camera up to my 60mm Meade refractor. The basic problem was that I couldn't reach focus even though all the pieces fit properly - the issue being that I had the focuser all the way up against the optical tube and was still not quite focused. I had to find a way to shorten the length of my adapters to give myself more room to focus.
I bought a .965" to t-thread adapter and was initially shocked with how big this thing is! It looked a lot smaller in pictures. This adapter was longer than the t-adapter that slides into the eyepiece, but I thought maybe since I could do away with the diagonal mirror it would still be short enough. (I was wrong).
I took my telescope and my entire set up to an Indiana Astronomical Society event to try to get some guidance. I was able to borrow a Barlow lens from another member, which seemed to help but I still couldn't quite get to focus. I had to daisychain all of these adapters and eyepiece cups together and it was still too long.
The next day I took a more critical look at the pieces that I already had to work with. I was pretty sure that I already tried every combination of pieces that came with my adapters, and I remember laying them all out on a table to see if I could get it to work. With fresh eyes I noticed that the smaller and of the .965" adapter unscrewed and I thought to myself the threads must be T threads because the entire tube is the same diameter.
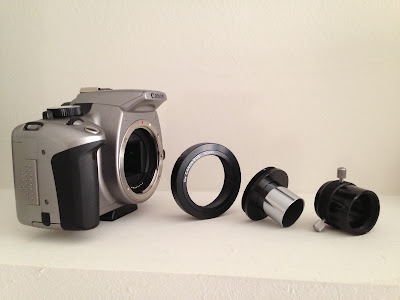 |
| Camera body --> T-ring --> T-thread to .965" --> .965" threaded collar |
 |
| .965" to T-thread camera adapter (too long, I used just the piece on the left) |
 |
| Collar screws onto the focuser tube and slides over the .965" male |
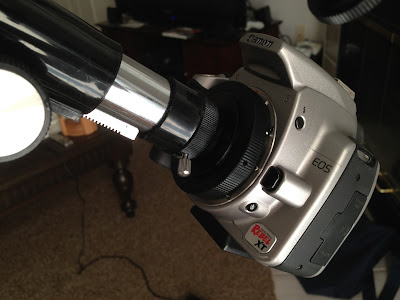 |
| A look at my prime focus setup. I was in focus at this distance (with an inch or so to spare on the focuser) |
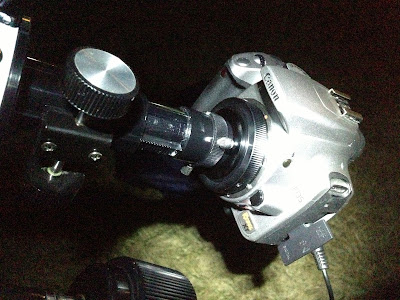 |
| Prime focus in the field (I was so pumped!) |
I went outside with this super short configuration and what do you know, it works!
How to Mirror Lock Up on Canon Rebel XT (with Photos)
My heavy camera attached to my tiny telescope and old mount causes noticeable vibrations when I release the shutter. The solution to this is to lock the mirror up before exposing the image so that there are no parts moving while the picture is being taken. Canon Rebel XT has a mirror lock up mode hidden in the settings, but it's definitely there!
Sunday, September 15, 2013
Omicron-1 Cygni and More Double Stars from the September Observing List
This month's Indiana Astronomical Society Novice/Urban Observing List is more difficult than last month. It includes a lot of double and multiple stars that I just can't resolve with my camera lens alone. I'm going to have to get better with my scope to find some separation in these stars.
I was able to pick a few off the list, however! I should also be able to get the Messier objects (maybe a second attempt at M15 since I already have that one from earlier). I photographed Gamma Delphini and Beta Cephei but couldn't find separation - they just looked like regular stars. I don't think that counts, so I'm going to wait and try to get photos through my scope.
I was able to pick a few off the list, however! I should also be able to get the Messier objects (maybe a second attempt at M15 since I already have that one from earlier). I photographed Gamma Delphini and Beta Cephei but couldn't find separation - they just looked like regular stars. I don't think that counts, so I'm going to wait and try to get photos through my scope.
 |
| Omicron-1 Cygni, Triple Star in Cygnus (a triple in a double) |
 |
| 61 Cygni, Double Star in Cygnus |
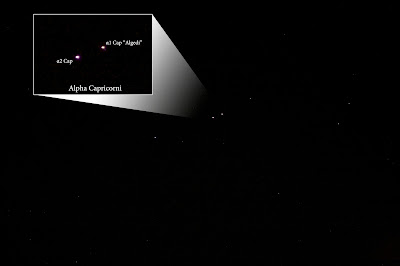 |
| Alpha-1/2 Capricorni, “Algiedi”, Multiple Star in Capricornis |
Huge Turnout at McCloud Nature Park Public Stargaze
The Indiana Astronomical Society and McCloud Nature Park hosted a public stargazing event last night. I brought along my Meade 285 (2.4" refractor) with hopes of getting some tips about Barlow lenses from the other members. Before I knew it, a caravan of minivans was rolling up to the Nature Center.
By the time I got my telescope set up and centered on the gibbous moon, I had a line of ten Girl Scouts anxious waiting for a chance to peek through the eyepiece! There were kids everywhere! It turns out an entire Girl Scout troop heard about the public stargazing event and decided to make it an outing. We had 110 people from the general public in attendance! I felt so cool fielding questions from the girls and their parents, it reminded me that I know a lot about the night sky.
I snapped a couple photos to try to capture the excitement. Since most of the girls were running around, they didn't show up in my 20 second exposure. But you can see the line of people forming behind the other scopes.
The wispy clouds limited the objects that we could see, and Saturn and Venus had already set below the treeline. I kept my scope focused on the moon for the most part, and let the bigger scopes provide views of the Andromeda Galaxy.
Even with the clouds and bright gibbous moon, you could tell this location is way better than the views I get in Brownsburg. I definitely want to plan a trip during the new moon. Another IAS member told me he was there sans moon and saw the Milky Way overhead reaching both horizons!
By the time I got my telescope set up and centered on the gibbous moon, I had a line of ten Girl Scouts anxious waiting for a chance to peek through the eyepiece! There were kids everywhere! It turns out an entire Girl Scout troop heard about the public stargazing event and decided to make it an outing. We had 110 people from the general public in attendance! I felt so cool fielding questions from the girls and their parents, it reminded me that I know a lot about the night sky.
 |
| Wispy clouds couldn't stop this record turnout |
I snapped a couple photos to try to capture the excitement. Since most of the girls were running around, they didn't show up in my 20 second exposure. But you can see the line of people forming behind the other scopes.
 |
| We had pretty good views for about an hour, then the clouds got worse |
The wispy clouds limited the objects that we could see, and Saturn and Venus had already set below the treeline. I kept my scope focused on the moon for the most part, and let the bigger scopes provide views of the Andromeda Galaxy.
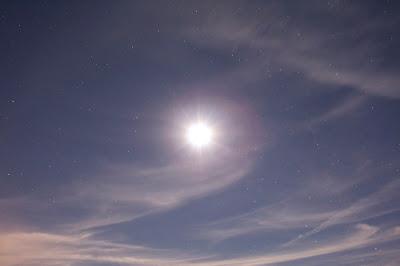 |
| The moon last night, took this 20 second exposure on accident while I was using autofocus |
Even with the clouds and bright gibbous moon, you could tell this location is way better than the views I get in Brownsburg. I definitely want to plan a trip during the new moon. Another IAS member told me he was there sans moon and saw the Milky Way overhead reaching both horizons!
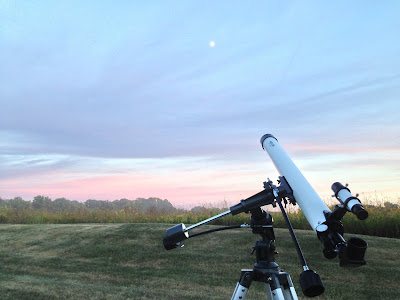 |
| HDR image taken with iPhone of my scope, the twilight clouds, and beautiful wildflowers in the field |
Tuesday, September 10, 2013
Conjunction: Crescent Moon with Venus September 8, 2013
Just visible through the haze, I saw the crescent moon setting alongside Venus. It wasn't visible for long, and I was able to get some pretty cool pictures. The haze made a neat little halo around the moon in the longer exposures, which wouldn't have been possible if it were totally clear.
 |
| Single frame original color at 300mm, 1.3 sec, f/5.6, ISO 1600 |
 |
| Single frame, color adjusted in Photoshop, 125mm, f/4.5, 1.6 sec, ISO 800 |
Mini Messier Marathon: M52, M103, and M33 (Triangulum Galaxy)
The last time I stacked images of Cassiopeia, I knew I wanted to go back to get some tighter shots. So many cool things to see! No surprise, this area of sky sits over the plane of the Milky Way, so there's always interesting objects nearby.
Here is a closer shot of M103, an open cluster in Cassiopeia. It's practically surrounded by other interesting New General Catalogue (NGC) objects!
Star clusters aside, let's try something a little harder. Here is my first attempt at the Triangulum Galaxy. Based on its magnitude, it should be an easy target - but it's very spread out and yet doesn't have a bright core like Andromeda. In fact, I couldn't even find this sucker with an 8 second exposure. I had to rely on the anchor stars nearby to be sure I was even in the right area - and finally a faint object emerged after (quite a bit of) post processing. I had some serious gradient issues in the middle of this frame, and I don't think I handled it very well.
And finally, although this is a little anticlimactic, here is M52, a dim open cluster in Cassiopeia. Wah-waaaah. Check another one off the list.
Here is a closer shot of M103, an open cluster in Cassiopeia. It's practically surrounded by other interesting New General Catalogue (NGC) objects!
 |
| 62 subs, 22 darks, 33 bias, each at 160mm, 1.6 sec, ISO 1600, f/5.0 |
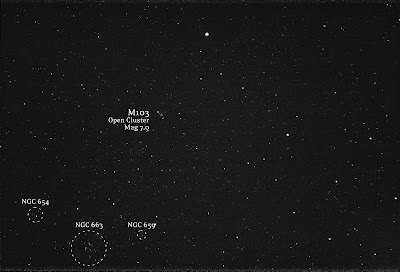 |
| 20 subs, 17 darks, 20 bias, each at 300mm, 1.3sec, ISO 1600, f/5.6 |
 |
| 227 subs, 94 subs, 126 bias, each at ISO 1600, f/5.6, 1.3 sec, 300mm |
 |
| 112 subs, 17 darks, 20 bias, each at 300mm, 1.3sec, ISO 1600, f/5.6 |
Friday, September 6, 2013
Prime Focus Problems, Can't Reach Focus on Meade Refractor
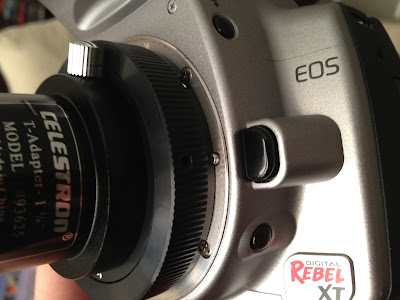
I'm trying to take the next step with my astrophotography, and that means utilizing my Meade 285 2.4" 900mm refractor. In order to do this, I need a way to mount my DSLR onto the telescope. I've heard of t-rings and t-adapters, and it seems pretty straight forward. The t-ring connects to the DSLR where the lens would normally attach - and therefore, you need to get one that corresponds to your type of camera (in my case Canon EOS).
Ok, so the t-ring is specific to your camera, but the t-adapter is a universal (I think?) thread dimension. The other side fits into a 1.25" eyepiece holder.
Ok, so everything was hunky-dory, and I got my t-ring and t-adapter connected to my camera. Last night, I took my telescope out to try to focus on Venus. I couldn't get Venus to focus. I tried taking my focuser tube all the way out, and all the way back in. It seemed to get the closest when I went all the way in, but it never got focused - not even close!
I finally looked up my telescope manual and read that my focuser tube is .965", which seems to be a smaller but somewhat common dimension for these low power scopes. So the issue is that my 1.25" thread t-adapter barrel (aka female) won't screw directly onto my .965" thread (aka male) focuser tube.
To resolve this (hopefully) I purchased a .965" telescope Basic Camera Adapter Japan T thread because it goes from .965" female to "T-thread" male (which should go directly into my t-ring female).
I also got some feedback on Instagram that I should get a Barlow lens, because not only will it give me about 2x magnification, but it will change my prime focus distance from the optical tube to within a range that my focuser can reach. I think I'll hold off on that until this guy comes in the mail. I'm not sure where a Barlow lens would fit exactly, and if they make a .965" to t-thread Barlow. I feel like I'm playing with a really expensive LEGO set and the pieces aren't matching up!
I'll post updates here as I try to figure this out...
Update: I got it to work!
Ok, so the t-ring is specific to your camera, but the t-adapter is a universal (I think?) thread dimension. The other side fits into a 1.25" eyepiece holder.
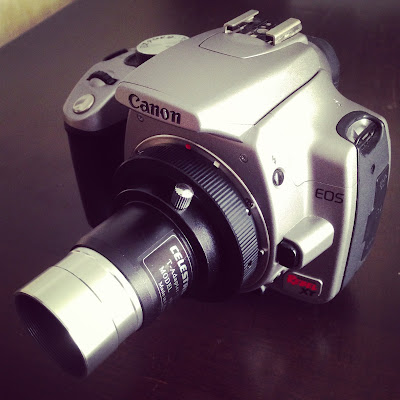 |
| T-ring and t-adapter assembled on Canon Rebel XT |
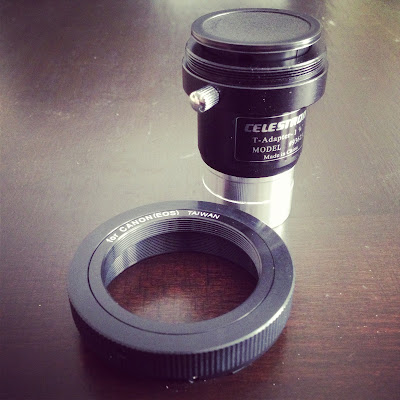 |
| T-ring for Canon EOS type, and universal 1.25" t-adapter |
 |
| T-ring fits snug into lens coupling, and locks with the lens release |
 |
| My setup that did not achieve focus. I think it's too long, so I'm going to cut out some pieces. |
I had my t-adapter nested into my 1.25" eyepiece holder because that's the only way that everything seemed to fit together. I tried taking my diagonal mirror off, and my other bits and pieces of tube and connectors - what a mess! I was trying to find a way to shorten my setup, because I figured that would compensate for my inability to focus any further 'up' the focuser tube.
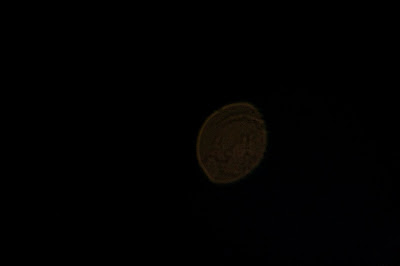 |
| Venus out of focus at the limit of my focuser (butting up against optical tube) |
To resolve this (hopefully) I purchased a .965" telescope Basic Camera Adapter Japan T thread because it goes from .965" female to "T-thread" male (which should go directly into my t-ring female).
I also got some feedback on Instagram that I should get a Barlow lens, because not only will it give me about 2x magnification, but it will change my prime focus distance from the optical tube to within a range that my focuser can reach. I think I'll hold off on that until this guy comes in the mail. I'm not sure where a Barlow lens would fit exactly, and if they make a .965" to t-thread Barlow. I feel like I'm playing with a really expensive LEGO set and the pieces aren't matching up!
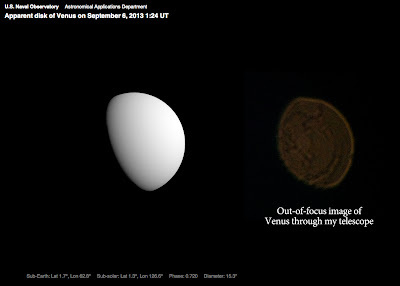 |
| As a consolation prize, however, I'm pretty sure my out of focus image of Venus corresponds to the phase of Venus last night, so that's pretty neat. |
I'll post updates here as I try to figure this out...
Update: I got it to work!
Wednesday, September 4, 2013
Starting the Next Andromeda Season with Baby Steps
We're getting to the point in the year when the Andromeda Galaxy (M31) is above the Indiana haze at around 11:30pm - so it's the earliest in the season to attempt a decent Andromeda stack. My previous attempt was back in January when I was first learning how to use Deep Sky Stacker - and while I haven't had too much practice since then, I figured I could do a little better.
For comparison, my previous attempt was during a gibbous moon with 318 light frames. This time around, I had a new moon and 667 light frames (but I chose to keep the best 80%, so an effective 534 total subs). Total exposure time is around 11 minutes. Images were taken with Canon Rebel XT (350D) on a fixed tripod.
It's definitely more recognizable than just a fuzzy blob! Granted, it's got plenty of fuzz and blob to go around. I try to remind myself that this is with a relatively slow lens and 8 megapixel camera (Canon Rebel XT) so it's not going to be Hubble quality. It's a baby step, and my best Andromeda to date! Still, after two nights of shooting, 4 hours of image stacking, and 2 hours of image processing, I had high expectations!
Update: Planning my shot...
Jason in the comments asked for an unprocessed light frame, but I can do one better. Here is some more info on how I planned out the shot.
For comparison, my previous attempt was during a gibbous moon with 318 light frames. This time around, I had a new moon and 667 light frames (but I chose to keep the best 80%, so an effective 534 total subs). Total exposure time is around 11 minutes. Images were taken with Canon Rebel XT (350D) on a fixed tripod.
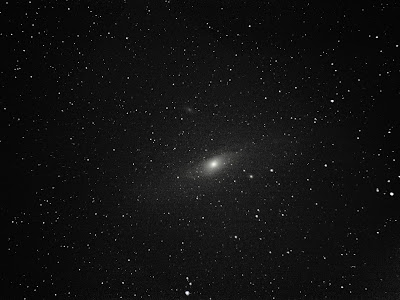 |
| Stack of 534 subs, 94 darks, 104 bias, f/5.6, 300mm, ISO 1600, 1.3 sec each Layered with my previous image at 30% transparency |
It's definitely more recognizable than just a fuzzy blob! Granted, it's got plenty of fuzz and blob to go around. I try to remind myself that this is with a relatively slow lens and 8 megapixel camera (Canon Rebel XT) so it's not going to be Hubble quality. It's a baby step, and my best Andromeda to date! Still, after two nights of shooting, 4 hours of image stacking, and 2 hours of image processing, I had high expectations!
 |
| Dust trails are visible on M31 as darker lines on the top ridge. M110 and M32 are featureless but visible nonetheless. |
 |
| Baby steps, improvement over my first Andromeda attempt |
Update: Planning my shot...
Jason in the comments asked for an unprocessed light frame, but I can do one better. Here is some more info on how I planned out the shot.
 |
| First I find the right general area by star-hopping from Mirach to the left |
Subscribe to:
Posts (Atom)


